Jo Liss - Opinionated Programmer2020-06-18T18:24:15+00:00https://www.solitr.com/blog/Octopress<![CDATA[Technical causes of today's OpenSSL vulnerabilities]]>2015-03-19T00:00:00+00:002015-03-19T00:00:00+00:00https://www.solitr.com/blog/2015/03/openssl-vulnerability-breakdown/I like to study vulnerabilities to help me write more secure code. Here are the vulnerabilities listed in the March 19th OpenSSL advisory (secadv_20150319.txt), ordered by underlying cause.
Segfaults, enabling DoS (maybe worse)
NULL pointer dereference:
OpenSSL 1.0.2 ClientHello sigalgs DoS (CVE-2015-0291):34e3edb
Use After Free following d2i_ECPrivatekey error (CVE-2015-0209):9e442d4, 5e5d53d
Unhandled dynamic type:
Segmentation fault in ASN1_TYPE_cmp (CVE-2015-0286):e677e8d
Unclear:
Empty CKE with client auth and DHE (CVE-2015-1787):d3cc5e6
Failed assert, enabling DoS
DoS via reachable assert in SSLv2 servers (CVE-2015-0293):86f8fb0
Cryptographic vulnerabilities, enabling MITM
Cipher downgrade:
Reclassified: RSA silently downgrades to EXPORT_RSA [Client] (CVE-2015-0204): ce325c6
Bad randomness:
Handshake with unseeded PRNG (CVE-2015-0285):e1b568d
]]><![CDATA[What's Next for Me (As of April 2014)]]>2014-04-08T00:00:00+00:002014-04-08T00:00:00+00:00https://www.solitr.com/blog/2014/04/whats-next/On a personal note, I just wanted to update everyone on what I’ve been up to:
Open Source
The past four months have been dedicated to working full time on
Broccoli (blog
post), thanks to
some savings from my previous consulting gigs, combined with moderate living
expenses.
In retrospect, taking time off to write Broccoli was clearly worth it. I went
one month over my original budget of three months, but people’s enthusiastic
reactions at EmberConf have convinced me that I solved a worthwhile problem,
and that writing Broccoli will pay off in productivity increases across the
community. Personally, having Broccoli will help me with the upcoming work on
my business, and writing it has helped me become a better developer.
Starting a week from now, I will scale my open-source work back to part time,
to about 1–2 hours per day. There is still work to be done on Broccoli as well
as related projects like ember-cli, but it doesn’t require full-time
commitment from me anymore.
Building better community is another thing I’m planning to dedicate some time
to. I will blog about this soon.
My vague expectation is that in a year or so, I will find another worthwhile
problem to solve, and take some time off in a similar fashion. In the
meantime, it is time for me to work on my business.
Business: Solitr
SEO
Solitr started off as a weekend project, but then I
noticed it started getting actual traffic. I knew that the highest-ranked site
for “solitaire” gets over 100k daily
visits, so
I figured that with ad-monetization alone, there’s probably a business there.
Since then, traffic to Solitr has risen to 4000 daily visits (mostly through
ranking for niche keywords), even though I haven’t been able to work much on
it so far. Some testing with AdSense indicates that I can start paying the
rent with it. That’s not much, but it feels quite liberating. It also makes me
confident that once the search ranking improves, I can have a viable business.
My plan is to hit 100k daily visitors by the end of 2015. Getting there will
require some SEO work, both on the main keyword (“solitaire”) and long tail
for niche keywords and i18n.
A/B Testing
I also want to learn A/B testing, in parallel to the SEO work. A/B testing
requires many data points to yield statistically significant results. Running
a free-to-play game presents a unique opportunity to get my hands dirty, as I
get a ludicrous number of data points very early in my business – the kind of
data that with a SaaS business you would only get at significant scale.
My role model for this is Patrick McKenzie
– my Solitr is approximately equivalent to his Bingo Card Creator – and his
extensive blogging has been of immeasurable value to me. I hope to pay it
forward by being open about Solitr and blogging about my adventures with A/B
testing in a similar vein.
I view the A/B testing work mostly as paid-for education. Perhaps I can
monetize it a bit by selling boutique consulting like Patrick. But more
importantly, I’ll have a valuable tool for scaling businesses in my
professional skill set. If I start a business in the future (say a B2B SaaS)
and it gets traction, I’m hoping that data-driven tools like A/B testing will
allow me to scale it and realize returns much faster than I’d be able to
otherwise.
That’s all for now. See you all soon, on Twitter and GitHub!
]]><![CDATA[Broccoli: First Beta Release]]>2014-02-17T00:00:00+00:002014-02-17T00:00:00+00:00https://www.solitr.com/blog/2014/02/broccoli-first-release/Broccoli is a new build tool. It’s
comparable to the Rails asset pipeline in scope, though it runs on Node and is
backend-agnostic.
After a long slew of 0.0.x alpha releases, I just pushed out the first beta
version, Broccoli 0.1.0.
Update March 2015: This post is still up-to-date with regard to
architectural considerations, but the syntax used in the examples is
outdated.
Table of Contents:
Quick Example
Motivation / Features
Architecture
Background / Larger Vision
Comparison With Other Build Tools
What’s Next
1. Quick Example
Here is a sample build definition file (Brocfile.js), presented without
commentary just to illustrate the syntax:
Run broccoli serve to watch the source files and continuously serve the
build output on localhost. Broccoli is optimized to make broccoli serve as
fast as possible, so you should never experience rebuild pauses.
Run broccoli build dist to run a one-off build and place the build output in
the dist directory.
The most important concern when designing Broccoli was enabling fast
incremental rebuilds. Here’s why:
Let’s say you’re using Grunt to build an application written with
CoffeeScript, Sass, and a few more such compilers. As you develop, you want to
edit files and reload the browser, without having to manually rebuild each
time. So you use grunt watch, to rebuild automatically. But as your
application grows, the build gets slower. Within a few months of development
time, your edit-reload cycle has turned into an edit-wait-10-seconds-reload
cycle.
So to speed up your build, you try rebuilding only the files that have
changed. This is difficult, because sometimes one output file depends on
multiple input files. You manually configure some dependency rules, to rebuild
the right files depending on which files were modified. But Grunt was never
designed to do this well, and your custom rule set won’t reliably rebuild the
right files. Sometimes it rebuilds files when it doesn’t have to (making your
build slow). Worse, sometimes it doesn’t rebuild files when it should (making
your build unreliable).
With Broccoli, once you fire up broccoli serve, it will figure out by itself
which files to watch, and only rebuild those that need rebuilding.
In effect, this means that rebuilds tend to be O(1) constant-time with the
number of files in your application, as you generally only rebuild one file.
I’m aiming for under 200 ms per rebuild with a typical build stack, since that
type of delay feels near-instantaneous to the human brain, though anything up
to half a second is acceptable in my book.
2.2. Chainable Plugins
Another concern was making plugins composable. Let me show you how easy it
is to compile CoffeeScript and then minify the output with Broccoli.
With Grunt, we’d have to create a temporary directory to store the
CoffeeScript output, as well as an output directory. As a result of all this
bookkeeping, Gruntfiles tend to grow rather lengthy. With Broccoli, all this
is handled automatically.
3. Architecture
For those who are curious, let me tell you about Broccoli’s architecture.
3.1. Trees, Not Files
Broccoli’s unit of abstraction to describe sources and build products is not a
file, but rather a tree – that is, a directory with files and subdirectories.
So it’s not file-goes-in-file-goes-out, it’s tree-goes-in-tree-goes-out.
If we designed Broccoli around individual files, we’d be able to compile
CoffeeScript just fine (as it compiles 1 input file into 1 output file), but
the API would be unnatural for compilers like Sass (which needs to read more
files as it encounters @import statements, and thus compiles n input files
into 1 output file).
On the other hand, with Broccoli’s design around trees, n:1 compilers like
Sass are no problem, while 1:1 compilers like CoffeeScript are an easily
expressible sub-case. In fact, we have a Filter base class for such 1:1
compilers to make them very easy to implement.
3.2. Plugins Just Return New Trees
This one is slightly more subtle: At first, I had designed Broccoli with two
primitives: a “tree”, which represents a directory with files, and a chainable
“transform”, which takes an input tree and returns a new compiled tree.
This implies that transforms map trees 1:1. Surprisingly, this is not a good
abstraction for all compilers. For instance, the Sass compiler has a notion of
“load paths” that it searches when it encounters an @import directive.
Similarly, JavaScript concatenators like r.js have a “paths” option to search
for imported modules. These load paths are ideally represented as a set of
“tree” objects.
As you can see, many real-world compilers actually map n trees into 1 tree.
The easiest way to support this is to let plugins deal with their input trees
themselves, thereby allowing them to take 0, 1, or n input trees.
But now that we let plugins handle their input trees, we don’t need to know
about compilers as first-class objects in Broccoli land anymore. Plugins
simply export functions that take zero or more input trees (and perhaps some
options), and return an object representing a new tree. For instance:
12345
broccoli.makeTree('lib')// => a treecompileCoffeeScript(tree)// => a treecompileSass(tree,{loadPaths:[moreTrees,...]})// => a tree
3.3. The File System Is The API
Remember that because Grunt doesn’t support chaining of plugins, we end up
having to manage temporary directories for intermediate build products in our
Grunt configurations, making them overly verbose and hard to maintain.
To avoid all this, our first intuition might be to abstract the file system
away into an in-memory API, representing trees as collections of streams. Gulp
for instance does this. I tried this in an early version of Broccoli, but it
turns out to make the code quite complicated: With streams, plugins now have
to worry about race conditions and deadlocks. Also, in addition to having a
notion of streams and paths, we need file attributes like last-modified time
and size in our API. And if we ever need the ability to re-read a file, or
seek, or memory-map, or if we need to pass an input tree to another process
we’re shelling out to, the stream API fails us and we have to write out the
entire tree to the file system first. So much complexity!
But wait. If we’re going to replicate just about every feature of the file
system, and in some cases we have to fall back to turning our in-memory
representation into an actual tree on the file system and back again, then …
why don’t we use the actual file system instead?
Node’s fs module already provides as compact an API to the file system as we
could wish for.
The only disadvantage is that we have to manage temporary directories behind
the scenes, and clean them up. But that’s easy to do in practice.
People sometimes worry that writing to disk is slower. But even if you hit the
actual disk drive (which thanks to paging is rare), the bandwidth of modern
SSDs has become so high compared to CPU speed that the overhead tends to be
negligible.
3.4. Caching, Not Partial Rebuilding
When I originally tried to solve the problem of incremental rebuilds, I tried
to devise a way to check whether each existing output file is stale, so that
Broccoli could trigger the rebuild for a subset of its input files. But this
“partial rebuild” approach requires that we are able to trace which files an
output file depends on, all the way back to the source files, and it also
makes file deletion tricky. “Partial rebuilds” is the classical approach of
Make, as well as the Rails asset pipeline, Rake::Pipeline, and Brunch, but
I’ve come to believe that it’s unnecessarily complicated.
Broccoli’s approach is much simpler: Ask each plugin to cache its build output
as appropriate. When we rebuild, start with a blank slate, and re-run the
entire build process. Plugins will be able to provide most of their output
from their caches, which takes near-zero time.
Broccoli started off providing some caching primitives, but it turned out
unnecessary to have this in the core API. Now we just make sure that the
general architecture doesn’t stand in the way of caching.
For plugins that map files 1:1, like the CoffeeScript compiler, we can
use common caching code (provided by the
broccoli-filter package), leaving
the plugin code looking
very simple.
Plugins that map files n:1, like Sass, need to be more careful about
invalidating their caches, so they need to provide custom caching logic. I
assume that we’ll still be able to extract some common caching logic in the
future.
3.5. No Parallelism
If we all suffer from slow builds, should we try to parallelize builds,
compiling multiple files in parallel?
My answer is no: The reason is that parallelism makes it possible to have
race conditions in plugins, which you might not notice until deploy time.
These are the worst kinds of bugs, and avoiding parallel execution eliminates
this entire class of bugs.
On the other hand, Amdahl’s law
stops us from gaining much performance through parallelizing. For a simplified
example, say our build process takes 16 seconds in total. Let’s say 50% of it
can be parallelized, and the rest needs to run in sequence (e.g.
CoffeeScript-then-concatenate-then-UglifyJS). If we run this on a 4-core
machine, the build would take 8 seconds for the sequential part plus 8 / 4 = 2
seconds for the parallel part, still totaling 10 seconds, less than a 40%
performance gain.
For incremental rebuilds, which constitute the hot path that we really care
about, caching tends to eliminate most of the parallelizable parts of the
build process anyway, so we are left with little to no performance gain.
Because of that, in general I believe that parallelizing the build process is
not a good trade. In principle you could write a Broccoli plugin that performs
some work in a parallel fashion. However, Broccoli’s primitives, as well as
the helper code that I’ve published on GitHub, actively encourage
deterministic sequential code patterns.
4. Background / Larger Vision
There are two main motivators that made me tackle writing a good build tool.
The first motivator is better productivity, through fast incremental rebuilds.
I generally believe that developer productivity is largely determined by the
quality of the libraries and tools we use. The “edit file, reload browser”
cycle that we perform hundreds of times a day is probably the core feedback
loop when we program. A great way to improve our tooling is getting this
edit-reload feedback loop to be as fast as humanly possible.
The second motivator is encouraging an ecosystem of front-end packages.
I believe that Bower and the ES6 module system will help us build a great
ecosystem, but Bower by itself is useless unless you have a build tool running
on top. This is because Bower is a content-agnostic transport tool that only
dumps all your dependencies (and their dependencies, recursively) into the
file system—it’s up to you what to do with them. Broccoli aims to become the
missing build tool sitting on top.
Note that Broccoli itself is angnostic about Bower or ES6 modules—you can use
it for whatever you like. (I am aware there are other stacks, like npm +
browserify, or npm + r.js.) I will discuss all of this in more detail in a
future blog post.
5. Comparison With Other Build Tools
If you are almost convinced but also wondering how other build tools stack up
against Broccoli, let me tell you why I wrote Broccoli instead of using any of
the following:
Grunt is a task runner, and it never set out to be a build tool. If you
try to (ab)use it as a build tool, you quickly find that because it doesn’t
attempt to handle chaining (composition), you end up having to manage
temporary directories for intermediate build products yourself, adding a lot
of complexity to your Grunt configuration. It also does not support reliable
incremental rebuilds, so your rebuilds will tend to be slow and/or unreliable;
see section “Fast Rebuilds” above.
That said, Grunt’s utility as a task runner is in providing a cross-platform
way to run shell-script type functionality, such as deploying your app or
generating scaffolding. Broccoli will be able to act as a Grunt plugin in the
future, so that you can call it from your Gruntfile.
Gulp tries to solve the problem of chaining plugins,
but in my view it gets the architecture wrong: Rather than passing around
trees, it passes around sequences (= event streams) of files (= streams or
buffers).
This works fine for cases where one input file maps into one output
file. But when a plugin needs to follow import statements, and thus needs to
access input files out of order, things get complicated.
For now, plugins that follow import statements tend to just just bypass the
build tool and read directly from the
file system.
In the future, I hear that there will be helper libraries to turn all the
streams into a (virtual) file system and pass that to the compiler. I would
claim though that all this complexity is a symptom of an impedance mismatch
between the build tool and the compiler. See “Trees, Not Files” above for more
on this. I’m also not convinced that abstracting away files behind a stream or
buffer API is helpful at all; see “The File System Is The API” above.
Brunch, like Gulp, uses a file-based (not tree-based) in-memory API (see
this method
signature).
Like with Gulp, plugins end up falling back to bypassing the build
tool
when they need to read more than one file.
Brunch also tries to do partial rebuilding rather than caching; see section
“Caching, Not Partial Rebuilding” above.
Rake::Pipeline is written in Ruby, which is less ubiquitous than Node in
front-end land. It tries to do partial rebuilds as well. Yehuda says it’s not
heavily maintained anymore, and that he’s betting on Broccoli.
The Rails asset pipeline uses partial rebuilds as well, and uses very
different code paths for development mode and production (precompilation)
mode, causing people to have unexpected issues when they deploy. More
importantly it’s tied to Rails as a backend.
I would like to see other people get involved in writing plugins. Wrapping
compilers is easy, but the hard and important part is getting caching and
performance right. We’ll also want to work on generalizing more caching
patterns in addition to
broccoli-filter, so that plugins
don’t suffer from excessive boilerplate.
Over the next week or two, my plan is to improve the documentation and clean
up the code base of Broccoli core and the plugins. We will also have to add a
test suite to Broccoli core, and figure out an elegant way to integration-test
Broccoli plugins against Broccoli core.
Another thing that’s missing with the existing plugins is source map support.
This is slightly complicated by performance considerations, as well as the
fact that chained plugins need to consume other plugins’ source maps and
interoperate properly, so I haven’t found the time to tackle this yet.
Broccoli will see active use in the Ember ecosystem, powering the default
stack emitted by ember-cli (an
upcoming tool similar in functionality to the rails command). We are also
hoping to move the build process used for generating the Ember core and
ember-data distributions from Rake::Pipeline and Grunt to Broccoli.
That said, I would love to see Broccoli adopted outside the Ember community as
well. JS MVC applications written with frameworks like Angular or Backbone, as
well as JavaScript and CSS libraries that require build steps, are all prime
candidates for being built by Broccoli.
I don’t currently see any major roadblocks on the path to Broccoli becoming
stable. By using it for real-world build scenarios, we should gain confidence
in its API, and I’m hoping that we can bump the version to 1.0.0 within a few
months’ time.
This blog post is the first comprehensive explanation of Broccoli’s
architecture, and the documentation is still somewhat sparse. I’m happy to
help you get started, and fix any bugs you encounter. Come find me on
#broccolijs on Freenode, or at
joliss42@gmail.com on Google Talk. I’ll also
respond to any issues you post on GitHub.
Thanks to Jonas Nicklas, Josef Brandl, Paul Miller, Erik Bryn, Yehuda Katz,
Jeff Felchner, Chris Willard, Joe Fiorini, Luke Melia, Andrew Davey, and Alex
Matchneer for reading and critiquing drafts of this post.
]]><![CDATA[The State of Libsass (versus Ruby Sass)]]>2014-01-29T00:00:00+00:002014-01-29T00:00:00+00:00https://www.solitr.com/blog/2014/01/state-of-libsass/Libsass is a C++ re-implementation of
the Ruby-based Sass compiler. It’s an order of
magnitude
faster than Ruby Sass, but hasn’t seen as much adoption yet.
I recently asked Aaron Leung, the current
maintainer, about the state of libsass. He kindly agreed to let me publish his
response, rendered below. Shout-out to his employer
Moovweb, who, Aaron lets me know,
have been paying him to work on libsass.
Hi Jo,
I appreciate your interest in LibSass! It’s been very stable – the company I work for uses it internally in our SDK and build server, and it’s been running fine. Unfortunately, in terms of features, it hasn’t fully caught up with the Ruby implementation yet. The biggest deficiency right now is that @extend isn’t fully functional – LibSass works correctly for more basic uses of @extend, but a full implementation is still 2-3 months out (it’s a very complex feature).
Off the top of my head, other incompatibilities include: * no 3.3 features yet * full UTF-8 support is in the works (hopefully will be done in a week or two) * @media blocks are following the scoping rules of pre-3.2 Sass * limited support for the new CSS filter functions * not properly handling namespaced selectors
In addition to those, there are miscellaneous little bugs that cause LibSass to generate incorrect output, mostly in obscure edge-casey stuff. However, thanks to a recent spike in community interest, I’ve been working harder to get all these things sorted out, and my employer is also interested in seeing LibSass become every bit as good as the Ruby version. Thanks to all that, as well as taking a closer look at the Ruby code, I’m hoping to get completely caught up with the Ruby version by mid-summer.
Hope this helps, and let me know if you have any more questions!
Aaron
He adds:
I should also let you know that we’re working on a more detailed feature/compatibility grid. More generally, we’re trying to be better about staying in touch with the community this year (via blog posts, talks at conferences & meetups, etc), so I’ll try to keep you apprised of any LibSass progress.
P.S. Keep in mind that the “mid-summer 2014” estimate above was given in
private email to me, and is not an official commitment on anyone’s part. ;-)
Libsass (a C++ implementation of Sass) and Rework turn out to be extremely
fast.
Background
The speed of your CSS preprocessor is important for developer/designer
ergonomics. The preprocessing time measured by this benchmark will typically
incur as a delay every time you edit the stylesheet sources and hit reload
in the browser. Delays below 0.2 to 0.5 seconds tend to be perceived by
the human brain as near-instantaneous. The higher the delay, the higher the
mental overhead.
To see how fast preprocessors are, I recently ran an informal benchmark of CSS
preprocessors. The benchmark garnered a lot of
interest, so I’m
posting this write-up in blog form.
Methods
I chose 200 KB of minified ungzipped CSS to simulate a large-ish web
application, because that’s approximately the amount that the Yahoo homepage
uses.
I used Ruby 2.1.0p0, Node 0.10.24, and the master branches of each library
(Sass 767c53f, libsass 991bc26, Stylus f539ef0, Rework c60edd3, less.js
281a895, r.js 84f325c).
Discussion
Libsass, Rework, LESS, and r.js came in below the 0.5 second threshold.
Ruby Sass and libsass
Libsass, a re-implementation of Sass in C++, provides a massive (>10x) speed
improvement over the original Sass written in Ruby, dropping processing time
from 2.5 seconds to 0.2 seconds. It is not quite a drop-in replacement for
Sass yet, but it’s getting a lot of development love from Aaron
Leung. It might be worth considering for new
applications.
People’s biggest worry about libsass seems to be losing the Ruby-based
Compass. Perhaps there will be an
alternative/re-implementation of Compass that is not Ruby-based. But even
without that, we might think about whether the massive speed increase of
libsass might justify going without Compass completely.
Given the speed difference, I’d like to suggest that the move from Ruby Sass
to libsass is inevitable, and I hope that it will see copious contributions
from the community to bring it up to par.
A surprising contender is the newer Rework coming in at only 0.2 seconds,
written in JavaScript but nearly as fast as libsass. LESS.js also did fairly
well at 0.5 seconds, while the third JavaScript-based preprocessor, Stylus,
fell on the slow side with 1.7 seconds. Perhaps it can be improved though.
I also included r.js, which was the fastest of all. While it’s not strictly a
preprocessor, it can inline @import statements, and so it can be used to
concatenate your project’s plain CSS files (if you are the minimalist type).
]]><![CDATA[Ember.js: Implementing text fields with save buttons]]>2012-06-11T00:00:00+00:002012-06-11T00:00:00+00:00https://www.solitr.com/blog/2012/06/ember-input-field-with-save-button/[Note: This post uses Ember master syntax. On 0.9.8.1, you may have to remove
view. in the *Binding attributes.]
Live Updating
Ember.TextField and
friends live-update their value property as the user enters text. You can use
valueBinding to bind to some model property, like so:
1
{{view Ember.TextField valueBinding="firstName"}}
Now firstName will be updated immediately as the user enters text.
With Save button
Oftentimes, live updating is not what you want. Instead, you want to update the
model data only when the user clicks a Save button.
This is a lazy-updating text field. Whenever you set or update its value
property, the contents get updated, but when the user changes the contents,
they are not written back into value.
There is another way to achieve this, using the built-in live-updating
Ember.TextField and a one-way binding. It’s more compact, though slightly
more opaque:
Now instantiate LazyTextField, and bind your model data to source instead of
value, and property changes will propagate only from source to value, but
not vice versa (unless explicitly copied by the save function).
]]><![CDATA[Roll your own drag-and-drop handling, with help from jQuery UI]]>2012-05-08T00:00:00+00:002012-05-08T00:00:00+00:00https://www.solitr.com/blog/2012/05/roll-your-own-drag-and-drop-handling-with-jquery-ui/In which I show how to harness jQuery UI’s Mouse plugin to roll your own
drag-and-drop handling, when Draggable is not flexible enough for you.
Overview
Sometimes you need tighter control over drag-and-drop logic than jQuery UI’s
Draggable and
Droppable plugins afford. For instance,
when I wrote up the Solitr game, I initially used
Draggable, but I ended up with an unmaintainable mess of auxiliary “drop-zone”
divs, and I also didn’t find the drop logic to be flexible enough for a game.
But simply binding to mousedown and mousemove events yourself will cause a
headache because you’d have to work around subtle cross-browser compatibility
issues.
Luckily, jQuery UI comes with a
Mouse
plugin. (Incidentally, Draggable derives from this.) We can use this
to handle mouseStart, mouseDrag, and mouseStop events in a way that works
consistently across browsers.
Setup
It’s not possible/useful to instantiate the mouse widget directly, but we can
easily subclass it to make it usable with our own custom event handlers. Simply
copy and paste the following code, which registers a custommouse plugin, to
get started:
12345678910111213141516171819202122232425
$.widget('ui.custommouse',$.ui.mouse,{options:{mouseStart:function(e){},mouseDrag:function(e){},mouseStop:function(e){},mouseCapture:function(e){returntrue;}},// Forward events to custom handlers_mouseStart:function(e){returnthis.options.mouseStart(e);},_mouseDrag:function(e){returnthis.options.mouseDrag(e);},_mouseStop:function(e){returnthis.options.mouseStop(e);},_mouseCapture:function(e){returnthis.options.mouseCapture(e);}// Bookkeeping, inspired by DraggablewidgetEventPrefix:'custommouse',_init:function(){returnthis._mouseInit();},_create:function(){returnthis.element.addClass('ui-custommouse');},_destroy:function(){this._mouseDestroy();returnthis.element.removeClass('ui-custommouse');},});
Now instantiate the custommouse plugin we just defined, and pass your own
event handlers:
12345678910111213141516171819202122
$('#containerElement').custommouse({mouseStart:function(e){// Handle the start of a drag-and-drop sequence here ...},mouseDrag:function(e){// Handle the dragging ...},mouseStop:function(e){// Handle the drop ...},mouseCapture:function(e){// Optional event handler: Return false here when you want to ignore a// drag-and-drop sequence, so the start/drag/stop events don't fire ...returntrue;}// Goodies from the Mouse plugin:// Minimum distance in pixels before dragging is triggered//distance: 1// Minimum time in milliseconds before dragging is triggered//delay: 0});
Event Sequence
Say the user starts dragging horizontally at point 50, 50, with distance
set to 10. Then the event sequence is guaranteed to be as follows.
123456789101112131415161718192021222324252627
Event         e.pageX, e.pageY  Notes
============= ================= =======================================
mouseCapture  50, 50            Subsequent events only trigger if true

    ... user drags until they reach 60, 50 ...

mouseStart    50, 50            Mouse cursor is already at 60, 50, but
                                this triggers "late" at the original
                                position, once minimum distance and
                                delay are exceeded

mouseDrag     60, 50            First mouseDrag fires event immediately
                                after mouseStart, at real cursor
                                position

    ... user keeps dragging ...

mouseDrag     63, 50

    ... and dragging ...

mouseDrag     68, 50

    ... and releases the mouse ...

mouseStop     68, 50            Perhaps this is not guaranteed to be in
                                the same position as the last mouseDrag
So much for the theory. Let me give you some practical hints on how to
implement this:
Practical Hints
There are many coordinate properties on the event object, but you should use
e.pageX and e.pageY, which are
standardized
by jQuery to return the coordinates relative to the top left corner of the
entire document.
The only exception is the
elementFromPoint
method, which on modern
browsers takes
e.clientX and e.clientY and returns the element under that point.
Then in the mouseDrag handler, calculate the offset:
1234567891011
mouseDrag:function(e){vardragOffset={left:e.pageX-this.dragStart.left,top:e.pageY-this.dragStart.top};// Assuming the element is absolutely positioned already$(this.element).css({left:this.originalElementPosition.left+dragOffset.left,top:this.originalElementPosition.top+dragOffset.top});}
Finally, in mouseStop, snap the element to the nearest drop point (or
whatever
logic
you want to implement), and update the application state if necessary.
Finally
It would be sweet to handle touch events to make this work on mobile devices.
Unfortunately, the Mouse plugin doesn’t support touch handling yet. I have a
feeling that there will a lot of issues with inconsistent browser behavior if I
try to do this myself, so I’m leaving it for now.
In any case, I hope that this post was helpful to you. If you have practical
insights or alternative techniques to share (perhaps even without using
jquery.ui.mouse), please leave a comment!
]]><![CDATA[Getting Started With Konacha: JavaScript Testing on Rails]]>2012-04-03T00:00:00+00:002012-04-03T00:00:00+00:00https://www.solitr.com/blog/2012/04/konacha-tutorial-javascript-testing-with-rails/Konacha is a testing tool for JavaScript applications running on Rails.
Why Konacha?
It’s very fast.
It treats JavaScript like a first-class citizen: Your tests are written in
JavaScript, call into JavaScript code, and inspect JavaScript objects. You can
still trigger events, e.g. with jQuery, if you need to simulate user actions.
It comes with support for the Rails asset pipeline. [1]
It supports CoffeeScript.
You can use the in-browser runner (good for development), or run your test
suite from the command line through Selenium (good for build servers).
What it cannot do is talk to the server. In particular:
It cannot use the database.
It cannot access your Rails (server-side) views. Any DOM nodes you are
testing need to be created on the client side (for instance with JST
templates), not served out by views.
When you need either of these two, write integration tests with Capybara
instead.
Tutorial: Overview
Testing Plain JavaScript
Let’s start by testing some pure JavaScript (without DOM manipulation). Say you
want to test the following function in a Rails 3.1+ app:
app/assets/javascripts/prime_numbers.js
12345678
isPrime=function(n){for(vari=2;i<n;i++){if(!(n%i)){returnfalse;}}returntrue;// intentionally wrong for 0 and 1};
To test this, first add Konacha to your Gemfile:
Gemfile
123
group:test,:developmentdogem'konacha'end
Now mkdir -p spec/javascripts, and create a spec file:
spec/javascripts/prime_numbers_spec.js
12345678910111213141516
//= require prime_numbersdescribe('isPrime',function(){it('should be true for prime numbers',function(){isPrime(2).should.be.true;isPrime(3).should.be.true;});it('should be false for numbers with non-trivial divisors',function(){isPrime(4).should.be.false;isPrime(6).should.be.false;});it('should be false for 0 and 1',function(){isPrime(0).should.be.false;isPrime(1).should.be.false;});});
We’ll get to the details of the syntax in a minute.
If you prefer CoffeeScript, you can also use .js.coffee spec files. For spec
files in particular, I find CoffeeScript much more readable than plain
JavaScript.
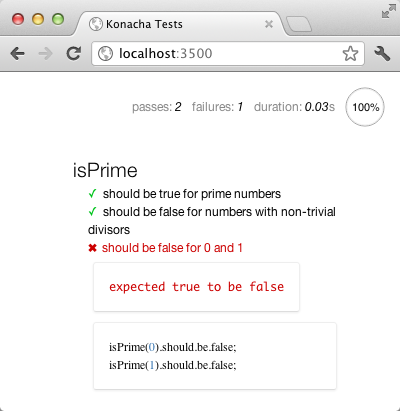
Run bundle exec rake konacha:serve, and point your browser at
localhost:3500.
If everything loaded alright, you should now see two tests passing, and the
third one failing:
If that’s not what you are getting, make sure you have a JavaScript console
open in the Konacha browser window, so you can see errors. If there are any
issues with loading your tests (such as syntax errors in your test
declarations), Konacha will not catch it and display an error. You just get a
blank test page, or worse, parts of your test suite are silently dropped. For
that reason, I always run my tests with a JavaScript console open.
Here, appendTo shall be the method used to initialize our app and render it
into the DOM – normally into an empty root div provided by the view. To test
it with Konacha, we render it into the special #konacha div, which is
automatically cleared between test cases.
spec/javascripts/view_spec.js
123456789101112
//= require views//= require jquerydescribe('application view',function(){it('should render',function(){// Call the production codeappendTo('#konacha');// Test that "Hello World" was rendered (by testing that the// number of .hello-world divs is truthy)assert.ok($('#konacha').find('div.hello-world').length);});});
The assertions you saw in the test code above – .should.be.false and
assert.ok(...) – are provided through the Chai testing library. Chai comes
with two assertion styles, which you can mix and match freely in your tests:
should/expect (“BDD-style”) and
assert (“TDD-style”).
I generally find the should style more readable, but I recommend you still
acquaint yourself with both styles, as they are not one-to-one equivalents.
If you are coming from RSpec, you will be disappointed to find that Chai’s
should interface is much less powerful than RSpec’s. For example, it does not
allow you to call arbitrary
operators
or predicate
methods.
So whereas in Ruby I would write a.should be_open, in JavaScript I write
assert.ok(a.open()) or a.open().should.be.ok.
Structure
Konacha uses the Mocha framework with the BDD
interface style to
structure your tests into suites and test cases. The describe/it syntax
should look familiar to most:
12345678
describe('Widget',function(){beforeEach(function(){// ... setup code here ...});it('should do things',function(){// ... test code here ...});});
Practical Hints
Extract common code into a spec/javascripts/spec_helper.js file, and //=
require spec_helper at the top of each spec file.
Group your tests into subdirectories as you see fit.
It’s happened to me several times that I wrote assertions that cannot fail.
Examples include .should.be.thisIsATypo (does nothing) and
$('.foo').should.not.be.empty (empty does not play with jQuery).
For that reason, I recommend practicing test-first development, so you’ve
seen each of your tests fail at least once.
Writing DOM tests with jQuery turns out to be rather awkward. Try adding
chai-jquery to your project
for some jQuery-specific Chai assertions. For instance:
12
assert.ok($('.hello-world').length);// without chai-jquery$('.hello-world').should.exist;// with chai-jquery
Always keep a JavaScript console open while running tests, so you’ll see load
errors.
[1] Without asset pipeline support, you would either have to enumerate all your
dependencies manually, or include the generated application.js file and live
with stack-traces like application.js:54029.
Thanks to John Firebaugh, Yuri Gadow, and Joel Parker Henderson for reading
drafts of this.
]]><![CDATA[Bundling JavaScript With Your Gem? Make It Contributor-Friendly!]]>2012-04-02T00:00:00+00:002012-04-02T00:00:00+00:00https://www.solitr.com/blog/2012/04/contributor-friendly-gems/Many Rails gems these days bundle third-party assets, JavaScript assets in
particular.
Oftentimes gem authors simply dump .js files into their repository, sometimes
even concatenated build products. It’s a simple solution, and with tools like
Vendorer it doesn’t have to turn into a
maintenance headache.
But this makes it hard for users of your gem to contribute to your asset
upstream (that is, to the third-party code that you include). Imagine I am a
user of your gem: If I want to fix a bug in your gem code, it’s easy: I can
clone your repository, point the gem in my Gemfile at my checkout or fork
(with :path or :git), hack away at your code, and send you pull requests,
while all my changes are instantly live in my app. But I cannot do the same to
fix a bug in the third-party code you are shipping, since the version you
ship is almost never up-to-date with the upstream master. And if I cloned the
upstream, I would have trouble getting my fix back into your gem so I can use
it in my app immediately. By losing that instant gratification, I’m much less
likely to contribute to the upstream.
Luckily, this is easy to fix: Include the upstream using a Git submodule.
Then add a Rake task that copies or builds the files into vendor/assets.
Now it’s easy to contribute: I simply clone your repository and set :path as
before, and then check out the master branch on the submodule. I can hack away
and send pull requests to the upstream straight from the submodule, while at
the same time my changes to the upstream will be live in my app through your
gem.
I call this quality contributor-friendliness. It’s not so much a service to
your users – most won’t even care – as it is to the upstream project. By
making it easy to contribute through your gem, you have expanded the upstream’s
base of potential contributors with your users.
I think making open source work better is worth the overhead of using
submodules, even if dumping vendor files might be easier sometimes. Our
upstream maintainers provide all this awesome code. Let’s be nice to them and
make our gems contributor-friendly.
Update June 2012:
This has been used in practice in
Konacha and
jquery-ui-rails. It seems to be
working well so far.
To see a working Rake task, check the :assets task in Konacha’s
Rakefile.
One insight we’ve had is to always check in the generated asset files. This is
necessary so your library can be used in Bundler like so:
1
gem'foo',:git=>'...'
Bundler obviously won’t run your build step, so everything needs to be checked
in.
]]><![CDATA[markdown-rails: Markdown for your views and partials]]>2012-02-23T00:00:00+00:002012-02-23T00:00:00+00:00https://www.solitr.com/blog/2012/02/markdown-rails-for-static-views/In my Rails apps, I have a lot of static prose, and that prose tends to be
written in HTML. As a result, it’s cumbersome to edit.
Markdown would be much better suited for prose. However, Rails does not support
.html.md views out of the box.
As described by @tjwallace, there
is a simple workaround – use HAML’s
:markdownfilter:
1234
:markdown
  **Markdown** goes here.

  The time is #{Time.now}.
Still, this leaves your Markdown files indented. I thought there is no reason
why Rails shouldn’t support plain .html.md files.
So I wrote up a simple markdown-rails gem. Check it out:
One shortcoming is, it doesn’t support embedded Ruby code (like HAML’s
:markdown filter with #{exp}). I’d love to add this at some point, but I’m
not sure about the best approach. See the comments and the Limitations section
in the README.
]]><![CDATA[Announcing the jquery-ui-rails Gem: jQuery UI for the Asset Pipeline]]>2012-02-20T00:00:00+00:002012-02-20T00:00:00+00:00https://www.solitr.com/blog/2012/02/jquery-ui-rails-gem-for-the-asset-pipeline/Have you ever headed to the jQuery UI download
page, selected some components, downloaded a
custom jQuery UI package, and dumped the files in your Rails app? Then you
probably felt as undignified as I did. This is not how we should have to
configure our libraries.
The only alternative right now is the
jquery-rails gem, which (in
addition to packaging jQuery) is nice enough to ship a jquery-ui.js asset
file for your convenience. However, this gives you all of jQuery UI’s
components (an extra 51KB gzipped) when you might need only one or two, and it
also does not give you the CSS and image files.
To put an end to this situation, I wrote up the
jquery-ui-rails gem, which
packages all the JavaScript, stylesheet and image files for the Rails 3.1+
asset pipeline.
It comes with individual jQuery UI modules, and it resolves dependencies
between the jQuery UI modules through the asset pipeline, so you can require
the component(s) you need and things will just work.
Also, the image references in the CSS files now point at images in the asset
pipeline. No more dumping PNGs in your public folder.
If you are using jQuery UI in your app right now, please give it a spin, and
let me know if it works for you!
P.S. Right now it only bundles the default theme (“Smoothness” I think), but
once it is possible to regenerate the theme
files, it
should be easy to ship all the themes in the
ThemeRoller gallery.
P.P.S. I haven’t tested it, but I see that CodeOfficer has made a
jquery-ui-rails-helpers
gem (and perhaps there are more helper gems that I don’t know about). See also
jquery ui - Modifying Rails helpers to add HTML
classes
on Stack Overflow. I’m not looking to add helpers to the jquery-ui-rails gem,
since I think it’s best to do one thing well, but if you have used helpers for
jQuery UI (or written your own), please share your experiences so other people
can benefit.
]]><![CDATA[How I Hand-Rolled MVC for a JavaScript Game (and It Was Awesome)]]>2012-02-13T00:00:00+00:002012-02-13T00:00:00+00:00https://www.solitr.com/blog/2012/02/mvc-designIn which
I sing the praises of frameworks like Ember.js,
explain why they don’t work so well for games, and
demonstrate how to structure any JavaScript app (game or not, framework or
not) around MVC for cleaner code.
I recently decided to improve the Solitr game
(GitHub) I had hacked together in a
one-day hackathon (blogged about
here).
The code had turned out rather messy, so I went for a rewrite with better
design, only copying bits and pieces from the first implementation.
A plethora of JavaScript MVC frameworks have cropped up since 2011 –
Backbone,
Spine, Knockout,
Ember, Batman, and
Serenade come to mind. I had used Backbone
before, but I had heard interesting things about Ember, so I decided to give
that a spin. I am rather enthused:
Why Ember.js Rocks
Probably the most important feature in Ember is attribute binding. It
allows attribute changes to automatically propagate through all layers of your
application. For example, say you change firstName on your model, then the
firstName attributes on your controller and view class are updated (because
they are “bound” to model.firstName), and the fullName helper attribute on
your view class gets recalculated as well, because it in turn is “bound” to
view.firstName.
This is the awesomest thing since sliced bread. It means that when your
controller responds to an event, it only needs to update the model and every
piece of your app that (directly on indirectly) depends on it is notified.
Ember’s in-place template updating deserves special attention too, and
coming from server-side templating languages, the significance of this feature
wasn’t obvious to me at first: When the fullName attribute in the previous
example is updated, Ember’s template engine will change the attribute inside
the template live in the DOM, and not just re-render the entire template.
That’s important because otherwise you lose all GUI state (such as collapsible
elements, or cursors in text fields) whenever a single attribute inside a
template changes. I learned this the hard way with a Backbone application I
worked on: Having to re-render views just because a counter increases is
bothersome for small page elements, but once you get to reloading an entire
pane, it becomes a usability issue, and one that’s rather hard to fix.
In other words, unlike on the server side, it’s useful for JavaScript
templating engines to be more intelligent than just spitting out a chunk of
HTML.
So attribute binding and template updating are the two things I recommend you
pay attention to when choosing an MVC framework.
Enter Games: On States and State Transitions
So I started to rewrite Solitr with Ember.js. A day or so into the rewrite
however, I was beginning to question whether Ember’s attribute-binding approach
was right for a game. Let me explain why.
When a card moves to a new place, it needs to be animated. So you can’t just
update the left and top CSS properties when the game state (and hence the
location of a card) changes. My first instict was to simply slide the
cards into place whenever the position changes, either by catching the
changes to the position attribute and wrapping it in a call to
jQuery’s .animate(), or using the CSS
transition property.
However, this doesn’t quite work: The type of animation you need depends on
the last action: For instance, turning over three cards on the stock, playing a
card you double-clicked, or snapping a card into place after it has been
drag-and-dropped, all require different sliding speeds and easing functions.
Of course you can hack the animation code so that it infers the right type of
animation from the difference between the current and the previous game state.
This might works most of the time, but besides being ugly, there are cases
where it’s not possible to know whether a given state change came about
through, say, double-click, drag-and-drop, or undo (all of which are animated
differently).
In this situation, compromising on the quality of the animations is a
no-brainer for a regular web application. But for a game, animations should
be first-class citizens. Since they are so ubiquitous in a game (even a
simple one like solitaire), treating them as less than first-class citizen will
yield hundreds of lines of unmaintainable animation spaghetti code.
So how do you make animations first-class citizens? Easy enough: You do not
update the game state and then ask the controller to update the GUI according
to the new state. Instead, you send a Command object (as described in
GoF’s Design Patterns) to the game
state so that it can update itself, and then send the same Command object to
the animation method so it can update the GUI based on the type of command.
In other words, the application is now fundamentally structured around state
transitions (commands, that is) rather than states.
This approach is probably untypical for “regular” web apps, and frameworks like
Ember.js discourage it by exposing state and hiding state transitions behind
the auto-updating mechanism for object attributes. Besides animations, the only use case I can
think of is when you absolutely need to build an undo stack: With your code
structured around state transitions, you can easily use Command objects for the
undo stack, rather than ad-hoc closures (or clones of the model object). Other
than that, I am not sure if for a non-game app that doesn’t require
sophisticated animations, this is worth the effort.
However, for game code, I have found that this pattern works very well, and it
has turned out to be very maintainable so far.
Hand-Rolling MVC
As I structured my app around Commands, my reliance on Ember’s features
started to disappear, and eventually I was left with Ember’s slightly
cumbersome attribute accessor syntax (card.get('rank') instead of
card.rank) with no benefit from it, as all my attributes had become
independent, and no auto-updating between objects (“binding” in Ember
parlance) was going on anymore.
The only thing Ember was doing for me was templating with Handlebars, but since
all I render are cards (essentially <div class="card" id="..."></div>), I
felt safe pulling these one-liners into the JavaScript code without sacrificing
maintainability.
So I removed the dependence on the Ember.js library. What was left was an
application handsomely structured around the MVC pattern, and compared to the
initial version I hacked together, the logical separation into model and
presentation code is the biggest single design improvement.
I haven’t found it necessary to derive either models or controllers from a
common base class.
Models
The models hold the game state and implement the game (domain) logic. I
deliberatedly kept the models isolated from the rest of the application, so the
code doesn’t know about the controllers or views, and also doesn’t need a DOM.
This has made the code much more maintainable. I’m also hoping that it will
help me when I write tests, perhaps with Mocha.
Card Model
The Card model is very simple. It only holds three attributes – rank,
suit, and id – and no logic at all. Whether it is face-up or face-down is
inferable from its place in the game (stock cards are always face-down, waste
cards are always face-up, etc.), so that is something that is determined by the
controller that renders it, not stored by the model.
The game state model, on the other hand, is rather more complicated. It holds
several arrays of cards (stock, waste, tableau piles, foundations), and encodes
the rules of the game (the domain logic, that is). Here is a slightly
simplified version:
12345678910111213141516171819202122232425
classApp.Models.KlondikeTurnThreecardsToTurn: 3numberOfFoundations: 4numberOfTableaux: 7# Initializationconstructor: -># initialize deck and arrayscreateDeck: -># create all the cards for the deckdeal: -># set up initial layout# RulesfoundationAccepts: (foundationIndex, cards) ->tableauPileAccepts: (tableauPileIndex, cards) ->isMovable: (card) -># CommandsexecuteCommand: (cmd) -># The Big Method that parses and executes commands,# thereby managing all state transitions# HelpersnextAutoCommand: -># Return command to auto-play and auto-flip# cards in some situations...otherhelpers...
While the model implements rule logic (with methods like foundationAccepts),
it does not enforce it. The controller has to check whether a given action is
legal in order to give proper user feedback. It then seemed redundant to
implement another such check in the game state model.
For simplicity’s sake, I decided not to let model classes proliferate: The piles
that make up the game state model (stock, waste, etc.) are dumb arrays, not
models on their own. Any logic that might conceivably be attached to those
piles is moved up into the all-knowing game state model.
Controllers
Paralleling the models, there is a simple Card controller performing basic rendering
duties, and a game controller (App.Controllers.KlondikeTurnThree) ordering the
cards around.
classApp.Controllers.KlondikeTurnThreemodel: nullconstructor: ->newGame: ->processCommand: (cmd) -># Call @model.executeCommand and @animateCardsanimateCards: (cmd) -># Paralleling executeCommand in the model, this method# animates the GUI# HousekeepingcalculateGeometry: ()->appendBaseElements: ()->registerEventHandlers: ->removeEventHandlers: -># The actual event handlersturnStock: =>redeal: =>...# And tons of helper functions dealing with minutiae like# drop zone geometry for drag'n'drop ......
To be honest, I’m finding that my game controller is becoming a sprawling
assortment of semi-related methods. I think this in part due to GUIs being
messy business, and in part due to suboptimal design. Eventually I will have
to split it into more classes, but for now it actually works quite well.
Views and Templates
The view classes and templates that most frameworks expect you to create have
been folded into the Controller classes. There is the occasional $('<div
class="button">...</div>'), and the cards are rendered by programmatically
by creating DOM nodes:
So far I haven’t needed to separate these from the controllers because they are
so miniscule. (I am sure that this will not scale though, and if you are using
an MVC framework that comes with templating functionality, you should
definitely use it from the get-go.)
Conclusions
Ember.js rocks because it can propagate (bind) attributes between objects,
and it auto-updates templates live without rerendering.
But attribute propagation is suboptimal for games, since animation requires
that you know about state transitions, not just state.
For any app, it greatly helps the design to follow MVC:
Create isolated model classes storing application state and implementing
domain logic.
Create controller classes that talk to the models and the DOM,
implementing the GUI logic.
Factor templates out of the controllers.
Factor helper methods for the templates into view classes.
]]><![CDATA[Screenshots with Capybara]]>2012-01-06T00:00:00+00:002012-01-06T00:00:00+00:00http://opinionatedprogrammer.com/?p=1130Just so I’ll never have to google this again, here is how to save and open a
screenshot with Capybara when you are using the :selenium driver:
12
page.driver.browser.save_screenshot'screenshot.png'Launchy.open'screenshot.png'# or open manually
Update: In Capybara 2.0.0.beta2, screenshotting has become part of the API
and can be done like this:
12
page.save_screenshot'screenshot.png'Launchy.open'screenshot.png'# or open manually
]]><![CDATA[Adding Twitter's Bootstrap CSS to your Rails app]]>2011-11-10T00:00:00+00:002011-11-10T00:00:00+00:00http://opinionatedprogrammer.com/?p=952Bootstrap in action, as demoed in Luca Pette's article
Updated Feb 2012 for Bootstrap 2.
Twitter’s new CSS toolkit, Bootstrap, is all the rage these days. I explain how to get the CSS, and optionally the mixins and the JavaScript, into your Rails app.
“How do I serve Bootstrap through Rails 3.1’s asset pipeline?”
Require it in your app/assets/stylesheets/application.css:
1
*= require twitter/bootstrap
Done. You now have Bootstrap 2 working in your Rails app. :-)
By the way: Did you know that Bootstrap is written in LESS, a stylesheet language like SCSS?
“Ugh, I hate LESS. Can I get Bootstrap as plain CSS please?”
That’s OK, not everybody likes LESS. Behind the scenes, less-rails-bootstrap
transparently compiles the Bootstrap LESS files into CSS through Rails’s asset
pipeline (using the less-rails gem). This means
that there is no scary client-side compilation with less.js (like the LESS
website advertises). And on the Rails side, you can just carry on using SCSS.
In other words, Bootstrap by default acts like any regular CSS library – all
the LESS stuff is hidden from you.
Warning: Do not get confused about requiring vs importing:
Use = require twitter/bootstrap at least once (typically in
application.css) to get all the CSS rules that come with Bootstrap. The files
will be processed through Sprockets (Rails’s asset handler), which guards
against duplicate inclusion. If you tried to require the mixins or
variables, it would have no effect, since Sprockets compiles them separately
from your stylesheets.
Add the two @import lines above to every LESS file in which
you want to use Bootstrap mixins or variables. As you can verify by
inspecting the CSS output, importing them has no effect (i.e. no CSS rules
are generated) until you actually use the mixins and variables in your own
CSS rules. If you tried to @import the entire “twitter/bootstrap”
library, it would show up multiple times in your compiled CSS assets, because
Sprockets can’t guard against duplicate inclusion when you use
@import.
To summarize, require the entire toolkit, and @import the
mixins and variables.
]]><![CDATA[18-Hour Hackathon: Making a CoffeeScript Solitaire]]>2011-11-07T00:00:00+00:002011-11-07T00:00:00+00:00http://opinionated-programmer.com/?p=930The making of solitr.com (source at github.com/joliss/solitr), a
CoffeeScript solitaire, in one 18-hour hackathon:
9:50 am: Sit down at laptop. What do I name my project? What CSS syntax
do I use? What CSS libraries?
10:45 am: Too much reading, let’s just decide and keep moving! “rails
new solitaire” (it’s 100% static, but I need Rails’s asset handling with
Sprockets), drop in yui-reset. Make controller, route root to
play#index.
11:10 am: Alright, let’s code up a data model (no ORM, just JS classes).
Cards first. Then a GameState class to hold the card positions. Lots of
googling for CoffeeScript and JavaScript basics in the process.
12:35 pm: Finish up data model. Make presentation layer. Code up CSS for
makeshift card rendering. Drop in Underscore.js for more coding
sanity.
4:00 pm: Work-in-progress (completely static): 1db97387. Next up
is event-handling. Read up on jQuery’s .on. Figure out how to drop
in jQuery 1.7 without making frickin jquery-rails unhappy with its
outdated jQuery. Code up some easy events.
7:40 pm: Brain in reasonable condition. 7.5 hours to go, still on
schedule I think. Time to start reading about dragging and
dropping. Painful stuff as expected.
10:35 pm: Houston! Problem! The way I set up the DOM structure is not
looking to work out with drag’n’drop. Check in work-in-progress and
revert to 7:40 pm instantly. Three hours lost, I think I’m off schedule
now. Let’s try again, using HTML/CSS only as a dumb rendering canvas,
with less DOM structure.
11:05 pm: Yup, looking better. Now for dragging and dropping, fingers
crossed. Time’s tight.
2:25 am: First working version: c475ae9e. Tired, but brain’s
still producing reasonable code. Time to drop in a pretty card deck with
CSS sprite handling, test, fix undo handling, add double-clicking, “you
win” message, “new game” buttons, make production environment work, test
some more.
5:35 am: It got late, but I’m done: 18961aa1. More than 2h over
budget, my 18h hackathon has become a 20h hackathon. And dragging of
multiple cards has a rendering issue. Still, I’m very happy with the
result. Brain is fried, off to bed.
(And the next day I set up solitr.com and pushed the code to
github.com/joliss/solitr. But I’ll blog about the whole
domain/DNS/deployment thing some other time in detail.)
Hackathon Retrospective
Oh my gosh. This was so much fun. I’ll definitely do hackathons again.
Being able to whip up a webapp on a whim is such a good feeling. Also, I
picked up a lot of CoffeeScript and jQuery that I wouldn’t have been
exposed to otherwise.
I’ve found that by doing a hackathon, I’m forced to just keep working,
so I’m producing code all day. I’ve rarely gotten so much output from my
brain in one day.
Pulling 18 hour work-days, of course, is rather not sustainable, let alone the
20 real hours that it turned into. But when you’re writing an app from scratch,
it’s only satisfying if at the end you have it actually working, so
compromising on scope is not really an option. I think the better alternative
is trying to get faster at creating new apps. Now that I know my way around the
basics of CoffeeScript and jQuery, I think I might be able to do the same thing
in 16 hours, which seems much more reasonable.
Next time I’ll try to get started faster at the beginning (less agonizing about
things like the name or the CSS library — it’s all trivial to change later),
and I’ll also try to be more disciplined in the last 2 hours to not let
non-essential features creep in.
]]><![CDATA[EC2 CPU benchmark: Fastest instance type (serial performance)]]>2011-07-25T00:00:00+00:002011-07-25T00:00:00+00:00http://opinionated-programmer.com/?p=807Update: This post is still relevant for build servers, but it turns out that at the moment EC2 does not give you a serial speed advantage over most modern laptops. Run the loop below on your laptop if you don’t believe me.
I sometimes use EC2 spot instances to run my test suite. To figure out which
instance type to use, I ran a
quick benchmark. I mostly care about serial performance, not the number
of cores, which left me with the following contenders (prices are hourly for
spot instances):
m1.large / $0.12 / “Large” 2 x 2 EC2 Compute Units; here: 2 cores of Intel Xeon E5507 @ 2.27GHz
m2.xlarge / $0.17 / “High-Memory Extra Large” 2 x 3.25 EC2 Compute Units; here: 2 cores of Intel Xeon X5550 @ 2.67GHz
c1.xlarge / $0.24 / “High-CPU Extra Large” 8 x 2.5 EC2 Computer Units; here: 2 cores of Intel Xeon E5506 @ 2.13GHz
cc1.4xlarge / $0.56 / “Cluster Compute Quadruple Extra Large” total 33.5 (I assume 16 x 2.1) EC2 Compute Units on two Intel Xeon X5570 @ 2.93GHz
I ran two benchmarks. First, the following loop:
1
time for i in {0..10000}; do for j in {0..1000}; do :; done; done
Second, my Rails app’s test suite, with Selenium on a headless X server,
unparallelized.
Here are the timings:
123456
Instance Type   Loop (sec)   Test suite (sec)
m1.large        47           79
m2.xlarge       28           51
c1.medium       45           67
c1.xlarge       37           63
cc1.4xlarge     27           64
Conclusion
The result seems pretty clear: For serial computation, the high-memory
instances (m2.xlarge and above) are the fastest.
(This of course is not because of the RAM, but because their CPUs happen to
have the highest serial computation power, as you might expect from the EC2
Compute Unit count provided by Amazon.)
Notes
The timings came back with +/- 1 on the loop, and +/- 2 on the test suite, so
at this point I am reasonably confident in the results.
Just to make sure, I launched an m2.4xlarge instance, and as expected, it has
the same CPU model and the same timings as m2.xlarge. The only difference is
that it comes with 8 cores instead of 2.
I’m not sure why the cluster-compute instance (cc1.4xlarge) is so slow on my
test suite, compared to the loop. I launched two different instances, in case
I had a “bad apple”, and both came out the same. Perhaps it’s some weird
timing issue in my test. But I think more likely, the CPUs in the
cluster-compute instances just happen to be very good at this particular
loop. (Unlike the loop timings, the slower test suite timing is in line with
what you might expect from Amazon’s EC2 Compute Unit count.)
All benchmarks were run on the official Ubuntu 11.04
AMIs, 32-bit for c1.medium, 64-bit for the rest, with EBS for the
cc1.4xlarge instance and instance storage for the rest.
]]><![CDATA[Creating a swap file with Chef]]>2011-07-01T00:00:00+00:002011-07-01T00:00:00+00:00http://opinionated-programmer.com/?p=780In case anyone else needs this, here is my Chef snippet to create a swap file:
1234567891011121314151617181920
script'create swapfile'dointerpreter'bash'not_if{File.exists?('/var/swapfile')}code<<-eof dd if=/dev/zero of=/var/swapfile bs=1M count=2048 && chmod 600 /var/swapfile && mkswap /var/swapfile eofendmount'/dev/null'do# swap file entry for fstabaction:enable# cannot mount; only add to fstabdevice'/var/swapfile'fstype'swap'endscript'activate swap'dointerpreter'bash'code'swapon -a'end
Normally I would use “none” as the mount point for a swap file, but Chef requires the mount point to
exist, so we use /dev/null instead. Chef cannot mount the fstab entry it
just created (because it only calls mount), so we use swapon.
Depending on how fast your disk is (I’m looking at you, Amazon!), dd
can take a while, so I recommend you put this at the end of your recipe (or
recipe list).
P.S. In case you were wondering where to put the swap file: Apparently
/var/swapfile is as
good a place as any.
P.P.S. No proselytizing in the comments about how swap partitions are faster
please, unless you show me a benchmark. ;-)
]]><![CDATA[Chef Solo tutorial: Managing a single server with Chef]]>2011-06-27T00:00:00+00:002011-06-27T00:00:00+00:00http://opinionated-programmer.com/?p=613The Chef documentation
assumes you have an entire server farm to manage, so it hits you with a lot of
complexity. If all you want is to set up and maintain a single VM, this
tutorial will help.
This is the cloud
We will be creating “throwaway” VMs that we can recreate with a single call. If you need to have a single server system persist for years across all changes, you should perhaps check out Puppet for a less cloudy solution.
Using Amazon EC2?
Any fresh instance of an Ubuntu AMI will do, for example ami-06ad526f (11.04, 32-bit EBS in us-east-1).
Hint: The EC2 API tools are (by nature) complex and error-prone, so I recommend you stay with the point-and-click web interface for as long as possible, instead of trying to automate launching new instances.
Hint 2: Create a separate EBS volume as a data partition to hold your databases, etc.
Hint 3: Use Elastic IPs for all your instances.
All you need is
a laptop with Bash and SSH (no need to even install Chef), and
any vanilla Linux server that you can SSH into.
Why do we run against vanilla servers? In my opinion, the system your
deployment scripts run against should be as minimal possible, essentially
straight from the vendor. So instead of manually installing packages like Chef
and then creating a snapshot to instantiate our VMs from, we will use a freshly
installed system and make the entire process scripted. On the downside, we need
some bootstrapping code (~30 LOC), but on the upside we get more repeatability
and less maintenance overhead, and we stay independent from any specific cloud
or virtualization provider.
Overview
Since we only have one server to manage, using Chef Server and Chef Clients is
clearly overkill. We will use Chef Solo instead. In a newly created directory
on our laptop, we will have the following files (all under version control if
you like):
123456
deploy.sh     <--- run "./deploy.sh" on your laptop to deploy
install.sh    <--- this is run on the server to bootstrap and call chef-solo
solo.json     <--- chef configuration
solo.rb       <--- chef configuration
cookbooks/op/recipes/default.rb   <--- the most important file -- your
                                       server recipe goes here
That’s all we need to turn any bare-bones Linux system into a fully equipped
server. Let’s now take a look at the contents of each file. You can copy and
paste freely (everything was written by me, and it’s in the public domain).
Some of it assumes Ubuntu – adjust accordingly.
deploy.sh
The deploy.sh script is the one you run on your laptop every time you
want to (re-)apply your Chef recipe to your server. It only copies the tree to
the server and runs install.sh:
12345678910111213141516
#!/bin/bash# Usage: ./deploy.sh [host]host="${1:-ubuntu@opinionatedprogrammer.com}"# The host key might change when we instantiate a new VM, so# we remove (-R) the old host key from known_hostsssh-keygen -R "${host#*@}" 2> /dev/null
tar cj . | ssh -o 'StrictHostKeyChecking no'"$host"'sudo rm -rf ~/chef &&mkdir ~/chef &&cd ~/chef &&tar xj &&sudo bash install.sh'
(Remember to change the default host name to match yours.)
install.sh
install.sh is responsible for bootstrapping the system if necessary
(installing Chef), and then calling the chef-solo binary. (You don’t
ever need to run it manually. Keep it mode 644 as a precaution against wrecking
your development machine.)
12345678910111213141516171819
#!/bin/bash# This runs as root on the serverchef_binary=/var/lib/gems/1.9.1/bin/chef-solo
# Are we on a vanilla system?if ! test -f "$chef_binary"; thenexport DEBIAN_FRONTEND=noninteractive
# Upgrade headlessly (this is only safe-ish on vanilla systems) aptitude update && apt-get -o Dpkg::Options::="--force-confnew"\ --force-yes -fuy dist-upgrade &&# Install Ruby and Chef aptitude install -y ruby1.9.1 ruby1.9.1-dev make && sudo gem1.9.1 install --no-rdoc --no-ri chef --version 0.10.0
fi&&"$chef_binary" -c solo.rb -j solo.json
solo.rb
solo.rb only sets two paths for Chef Solo. You should go with this:
solo.json holds a pointer to the recipe(s) we want to run (that’s only
one recipe for now). My cookbook is called “op” (for Opinionated
Programmer) – you should name yours after your server or your site.
123
{"run_list":["recipe[op::default]"]}
cookbooks/op/recipes/default.rb
I like to just have a single “default” recipe that holds all the server
configuration. If it gets out of hand, you can always split it up, but for
small sites, a single recipe file should be easiest to deal with.
A recipe is simply a list of resources. The Resources
page on the Chef wiki is probably the one piece of documentation you will be
consulting a lot.
I will give you a few examples of things you might want to do in your recipe:
# --- Install packages we need ---package'ntp'package'sysstat'package'apache2'# --- Add the data partition ---directory'/mnt/data_joliss'mount'/mnt/data_joliss'doaction[:mount,:enable]# mount and add to fstabdevice'data_joliss'device_type:labeloptions'noatime,errors=remount-ro'end# --- Set host name ---# Note how this is plain Ruby code, so we can define variables to# DRY up our code:hostname='opinionatedprogrammer.com'file'/etc/hostname'docontent"#{hostname}\n"endservice'hostname'doaction:restartendfile'/etc/hosts'docontent"127.0.0.1 localhost #{hostname}\n"end# --- Deploy a configuration file ---# For longer files, when using 'content "..."' becomes too# cumbersome, we can resort to deploying separate files:cookbook_file'/etc/apache2/apache2.conf'# This will copy cookbooks/op/files/default/apache2.conf (which# you'll have to create yourself) into place. Whenever you edit# that file, simply run "./deploy.sh" to copy it to the server.service'apache2'doaction:restartend
Note that all dependencies are implicitly given by the ordering of the
resources.
This should be enough examples to get you going. Again, all of these resources
(and many more) are documented on the Resources
page.
Hints
As you write your recipe, re-run ./deploy.sh frequently, like you would recompile a piece of software.
When you are done, tear down your VM and redeploy on a fresh system, just to make sure everything is working OK. Sometimes subtle dependency/ordering issues creep in that are only revealed by applying the entire recipe on a vanilla system. You don’t want to be left with a non-working recipe when your server goes down and you need to re-deploy afresh.
All code was written by me and is licensed under CC0 (public domain).
]]><![CDATA[Parsing YAML 1.1 with Ruby]]>2011-04-12T00:00:00+00:002011-04-12T00:00:00+00:00http://opinionated-programmer.com/?p=581To parse YAML with Ruby, do not use the YAML module, use
Psych (which ships with Ruby
1.9.2,
though there is also a gem).
The reason is that YAML uses the unmaintained Syck library, whereas
Psych uses the modern LibYAML:
1234567
>>require'yaml'>>YAML.load("%YAML 1.1\n---\n'test'")# %YAML directive not supported=>"%YAML 1.1 --- 'test'">>require'psych'>>Psych.load("%YAML 1.1\n---\n'test'")# all good=>"test"
P.S. Even if the YAML you are parsing is very simple, YAML silently runs into problems with escaped whitespace (“foo\ bar”), erroneously leaving the backslashes in the output. Psych handles this just fine.
P.P.S. YAML will use Psych instead of Syck as its engine if you have require 'psych' before require 'yaml' – thanks to Benoit Daloze for pointing this out. If this implicit behavior is causing pains for you, especially with Rails or Bundler, I recommend you read Matthew Kocher’s post about YAML, Psych, and Syck (and the discussion in the comments there).
]]><![CDATA[Capybara roundup]]>2011-03-14T00:00:00+00:002011-03-14T00:00:00+00:00http://opinionated-programmer.com/?p=505Here is a roundup of recent changes in and around
Capybara. Where they apply to the
Capybara source, they are not included in any release yet, so make sure you are
using the edge version from GitHub (and be prepared for things to break here
and there ^_^).
The Celerity and Culerity drivers have been extracted into the capybara-celerity and capybara-culerity gems (5c4f28, by Gabriel Sobrinho). They will be officially supported until (at least) Capybara 1.0, but Jonas recommends using Akephalos as your HtmlUnit driver.
For RSpec, Capybara now supports :type => :request example groups, as suggested by the rspec-rails gem (558e7b, by yours truly). See the README, section “Using Capybara with RSpec”.
There is now an (optional) acceptance test DSL for RSpec (f4897f, by Jonas Nicklas and Nicklas Ramhöj). See the README (section “Using Capybara with RSpec”) or Jeff Kreeftmeijer’s blog post.
The Selenium driver now waits for Ajax requests (021b87, by Maurizio Giambalvo, Jonas, and Nicklas). Search the README for :resynchronize for more info.
Capybara now prefers visible over hidden elements (408423, by Jonas and Nicklas, configurable with Capybara.prefer_visible_elements).
The RSpec matchers, which are responsible for giving you nice error messages (and allow you to write should_not have_css without breaking asynchronous JavaScript, though that’s not documented yet), have been improved and are now used in Cucumber as well. Jonas says they might still change a bit, so don’t rely on them too much.
John Firebaugh wrote a capybara-firebug gem to run Capybara with Firebug enabled.
Miscellaneous tips and tricks from around the web:
Leonid Shevtsov started a discussion on preloading the browser in Spork for Selenium, but we were not able to iron out all the kinks to make it usable. It would be most awesome to get this working, so if anyone has an idea, please post it!
Anything else? Leave a comment!
P.S. Thanks to Elabs for continuing to put
company resources into Capybara! Did you know you can hire them to do agile
web development for you? (Full disclosure: I’m not affiliated.)